Виявлення помилок з низькими накладними витратами за допомогою просторово-часових кодів
Оцінка використання: 10 секунд на процесорі Heron r3 (ПРИМІТКА: Це лише оцінка. Твій час виконання може відрізнятися.)
Навчальні результати
Після проходження цього посібника користувачі повинні розуміти наступне:
- Основи налаштування техніки виявлення помилок з використанням просторово-часових кодів
- Як налаштувати стан GHZ з високою точністю на обладнанні за допомогою виявлення помилок
Передумови
Рекомендується ознайомитися з цією темою:
- Основи обладнання для квантових обчислень корисного масштабу
Довідкова інформація
Виявлення помилок з низькими накладними витратами за допомогою просторово-часових кодів [1] від Simon Martiel та Ali Javadi-Abhari пропонує синтез просторово-часових перевірок з низькою вагою та врахуванням зв'язності для схем, що домінуються Кліффордом, з подальшим постселектуванням на цих перевірках для виявлення збоїв з набагато меншими накладними витратами, ніж повна корекція помилок, і меншою кількістю запусків, ніж стандартне пом'якшення помилок.
Ця стаття пропонує новий метод виявлення помилок у квантових схемах (зокрема схемах Кліффорда), який знаходить баланс між повною корекцією помилок і більш легкими методами пом'якшення. Ключова ідея полягає у використанні просторово-часових кодів для генерації "перевірок" по всій схемі, які здатні виявляти помилки, зі значно меншими накладними витратами на кубіти та гейти, ніж повна відмовостійка корекція помилок. Автори розробляють ефективні алгоритми для вибору перевірок, які мають низьку вагу (охоплюють мало кубітів), сумісні з фізичною зв'язністю пристрою та покривають великі часові та просторові регіони схеми. Вони демонструють підхід на схемах з до 50 логічних кубітів і ~2450 гейтів CZ, досягаючи підвищення точності фізичного до логічного рівня до 236x. Також зауважте, що коли схеми включають більше не-Кліффордових операцій, кількість дійсних перевірок зменшується експоненціально, що вказує на те, що метод найкраще працює для схем, що домінуються Кліффордом. Загалом, у найближчій перспективі виявлення помилок за допомогою просторово-часових кодів може запропонувати практичний шлях із меншими накладними витратами для підвищення надійності квантового обладнання.
Ця техніка виявлення помилок спирається на поняття когерентних перевірок Паулі та базується на роботі Одноразове пом'якшення помилок за допомогою когерентних перевірок Паулі [2] від van den Berg та ін.
Нещодавно стаття Великі коти: заплутування в 120 кубітах і далі [3] від Javadi-Abhari та ін. повідомляє про створення 120-кубітного стану Грінбергера-Хорна-Цайлінгера (GHZ), найбільшого багатостороннього заплутаного стану, досягнутого на сьогоднішній день на платформі з надпровідними кубітами. Використовуючи компілятор, що враховує обладнання, виявлення помилок з низькими накладними витратами та техніку "тимчасового скасування обчислення" для зменшення шуму, дослідники досягли точності 0,56 ± 0,03 з ефективністю постселекту приблизно 28%. Робота демонструє справжнє заплутування по всіх 120 кубітах, підтверджуючи кілька методів сертифікації точності, і відзначає важливий орієнтир для масштабованого квантового обладнання.
Цей посібник базується на цих ідеях, проводячи тебе через реалізацію алгоритму виявлення помилок спочатку на невеликій випадковій схемі Кліффорда, а потім через завдання підготовки стану GHZ, щоб допомогти тобі експериментувати з виявленням помилок на твоїх власних квантових схемах.
Вимоги
Перед початком цього посібника переконайся, що у тебе встановлено наступне:
- Qiskit SDK v2.0 або пізніше, з підтримкою візуалізації
- Qiskit Runtime v0.40 або пізніше (
pip install qiskit-ibm-runtime) - Qiskit Aer v0.17.2 (
pip install qiskit-aer)
Налаштування
# Added by doQumentation — required packages for this notebook
!pip install -q matplotlib numpy qiskit qiskit-aer qiskit-ibm-runtime
# Standard library imports
from collections import defaultdict, deque
from functools import partial

# External libraries
import matplotlib.pyplot as plt
import numpy as np

# Qiskit
from qiskit import ClassicalRegister, QuantumCircuit
from qiskit.circuit import Delay
from qiskit.circuit.library import RZGate, XGate
from qiskit.converters import circuit_to_dag, dag_to_circuit
from qiskit.quantum_info import Pauli, random_clifford
from qiskit.transpiler import AnalysisPass, PassManager
from qiskit.transpiler.passes import (
    ALAPScheduleAnalysis,
    CollectAndCollapse,
    PadDelay,
    PadDynamicalDecoupling,
    RemoveBarriers,
)
from qiskit.transpiler.passes.optimization.collect_and_collapse import (
    collect_using_filter_function,
    collapse_to_operation,
)
from qiskit.transpiler.preset_passmanagers import generate_preset_pass_manager
from qiskit.visualization import plot_gate_map, plot_histogram

# Qiskit Aer
from qiskit_aer import AerSimulator
from qiskit_aer.noise import NoiseModel, ReadoutError, depolarizing_error

# Qiskit IBM Runtime
from qiskit_ibm_runtime import QiskitRuntimeService
from qiskit_ibm_runtime import SamplerV2 as Sampler
Приклад малого масштабу на симуляторі
Крок 1: Відображення класичних вхідних даних на квантову задачу
Щоб продемонструвати цей метод, ми починаємо з побудови простої схеми Кліффорда. Наша мета - мати можливість виявляти, коли відбуваються певні типи помилок у цій схемі, щоб ми могли відкидати помилкові результати вимірювання. У термінології виявлення помилок це також відоме як наша корисна схема.
circ = random_clifford(num_qubits=2, seed=11).to_circuit()
circ.draw("mpl")

Крок 2: Оптимізація задачі для виконання на квантовому обладнанні
Наша мета - вставити когерентну перевірку Паулі в цю корисну схему. Але перш ніж ми це зробимо, ми розділяємо цю схему на шари. Це буде корисно пізніше при вставці гейтів Паулі між ними.
# Separate circuit into layers
dag = circuit_to_dag(circ)
circ_layers = []
for layer in dag.layers():
    layer_as_circuit = dag_to_circuit(layer["graph"])
    circ_layers.append(layer_as_circuit)

# Create subplots
fig, (ax1, ax2, ax3, ax4, ax5) = plt.subplots(1, 5, figsize=(10, 4))

# Draw circuits on respective axes
circ_layers[0].draw(output="mpl", ax=ax1)
circ_layers[1].draw(output="mpl", ax=ax2)
circ_layers[2].draw(output="mpl", ax=ax3)
circ_layers[3].draw(output="mpl", ax=ax4)
circ_layers[4].draw(output="mpl", ax=ax5)

# Adjust layout to prevent overlap
plt.tight_layout()
plt.show()

Тепер ми готові додати когерентні перевірки Паулі до корисної схеми. Для цього нам потрібно побудувати "дійсну перевірку" і вставити її в схему. "Перевірка" в цьому випадку - це оператор, здатний сигналізувати про те, чи сталася помилка в схемі, шляхом виконання вимірювання на допоміжному кубіті. Вона вважається дійсною перевіркою, коли додаткові оператори, вставлені в квантову схему, логічно не змінюють оригінальну схему.
Ця перевірка здатна виявляти типи помилок, які антикомутують з нею, і перевірка спричинить вимірювання стану у допоміжному кубіті замість через фазовий віддачу. Таким чином, ми зможемо відкидати вимірювання, де було зафіксовано помилку.
Загалом, когерентні перевірки Паулі - це контрольовані оператори Паулі, вставлені в "проводи" - просторово-часові місця між гейтами. Допоміжний кубіт, відповідальний за сигналізацію про помилку, є контрольним кубітом.
Нижче ми будуємо дійсну перевірку для схеми Кліффорда, яку ми створили вище. Ми можемо продемонструвати, що ця перевірка не змінює роботу схеми, показавши, що коли ці перевірки Паулі поширюються на початок схеми, вони скасовують одна одну. Це легко показати, оскільки оператор Паулі через гейт Кліффорда є іншим оператором Паулі.
Загалом, можна використовувати евристику декодування, як описано в [1], для визначення дійсних перевірок. Для цілей нашого початкового прикладу ми також можемо будувати дійсні перевірки, використовуючи аналітичні умови множення гейтів Паулі та Кліффорда.
# Define a valid check
pauli_1 = Pauli("ZI")
pauli_2 = Pauli("XZ")
circ_1 = circ_layers[0].compose(circ_layers[1])
circ_1.draw("mpl")

pauli_1_ev = pauli_1.evolve(circ_1, frame="h")
pauli_1_ev
Pauli('-ZI')
circ_2 = circ.copy()
circ_2.draw("mpl")
pauli_2_ev = pauli_2.evolve(circ_2, frame="h")
pauli_2_ev
Pauli('-ZI')
pauli_1_ev.dot(pauli_2_ev)
Pauli('II')
Як ми бачимо, ми маємо дійсну перевірку, оскільки вставлені оператори Паулі просто мають той самий ефект, що й оператор ідентичності на схемі. Тепер ми можемо вставити ці перевірки в схему з допоміжним кубітом. Цей допоміжний кубіт, або перевірочний кубіт, починається в стані . Він включає контрольовані версії операцій Паулі, описаних вище, і нарешті вимірюється в базисі . Цей перевірочний кубіт тепер здатний виявляти помилки в корисній схемі без логічної зміни її. Це тому, що певні типи шуму в корисній схемі змінять стан перевірочного кубіта, і він буде виміряний як "1" замість "0" у випадку виникнення такої помилки.
# New circuit with 3 qubits (2 payload + 1 ancilla for check)
circ_meas = QuantumCircuit(3)
circ_meas.h(0)
circ_meas.compose(circ_layers[0], [1, 2], inplace=True)
circ_meas.compose(circ_layers[1], [1, 2], inplace=True)
circ_meas.cz(0, 2)
circ_meas.compose(circ_layers[2], [1, 2], inplace=True)
circ_meas.compose(circ_layers[3], [1, 2], inplace=True)
circ_meas.compose(circ_layers[4], [1, 2], inplace=True)
circ_meas.cz(0, 1)
circ_meas.cx(0, 2)
circ_meas.h(0)

# Add measurement to payload qubits
c0 = ClassicalRegister(2, name="c0")
circ_meas.add_register(c0)
circ_meas.measure(1, c0[0])
circ_meas.measure(2, c0[1])

# Add measurement to check qubit
c1 = ClassicalRegister(1, name="c1")
circ_meas.add_register(c1)
circ_meas.measure(0, c1[0])

# Visualize the final circuit with the inserted checks
circ_meas.draw("mpl")

Крок 3: Виконання з використанням примітивів Qiskit
Якщо перевірочний кубіт виміряний як "0", ми зберігаємо це вимірювання. Якщо він виміряний як "1", то це означає, що в корисній схемі сталася помилка, і ми відкидаємо це вимірювання.
# Noiseless simulation using stabilizer method
sim_stab = AerSimulator(method="stabilizer")
res = sim_stab.run(circ_meas, shots=1000).result()
counts_noiseless = res.get_counts()
print(f"Stabilizer simulation result: {counts_noiseless}")
Stabilizer simulation result: {'0 11': 523, '0 01': 477}
# Qiskit Aer noise model
noise = NoiseModel()
p2 = 0.003  # two-qubit depolarizing per CZ
p1 = 0.001  # one-qubit depolarizing per 1q Clifford
pr = 0.01  # readout bit-flip probability

# 1q depolarizing on common 1q gates
e1 = depolarizing_error(p1, 1)
for g1 in ["id", "rz", "sx", "x", "h", "s"]:
    noise.add_all_qubit_quantum_error(e1, g1)

# 2q depolarizing on CZ
e2 = depolarizing_error(p2, 2)
noise.add_all_qubit_quantum_error(e2, "cz")

# Readout error on measure
ro = ReadoutError([[1 - pr, pr], [pr, 1 - pr]])
noise.add_all_qubit_readout_error(ro)

# Qiskit Aer simulation with noise model
aer = AerSimulator(method="automatic", seed_simulator=43210)
job = aer.run(circ_meas, shots=1000, noise_model=noise)
result = job.result()
counts_noisy = result.get_counts()
print(f"Noise model simulation result: {counts_noisy}")
Зауваж, що з ідеальним симулятором перевірочний кубіт не виявлятиме жодних помилок, як ми покажемо у наступному розділі постобробки. Тепер ми вводимо модель шуму в симуляцію і дивимося, як перевірочний кубіт виявляє помилки.
Noise model simulation result: {'1 01': 5, '0 11': 478, '1 11': 6, '1 00': 2, '1 10': 1, '0 01': 500, '0 00': 5, '0 10': 3}
Крок 4: Постобробка та повернення результату в бажаному класичному форматі
Тепер ми можемо отримати та проаналізувати результати завдання Sampler. Починаємо з відображення результатів беззашумлюваної симуляції.
# Plot the noiseless results
# Note that the first bit in the key corresponds to the check qubit
plot_histogram(counts_noiseless)

Як і очікувалося, перевірочний кубіт не виявляє жодних помилок. Далі відображаємо результати зашумленої симуляції.
# Plot results with noise model
plot_histogram(counts_noisy)

Як ми бачимо, деякі вимірювання виявили помилку, позначивши перевірочний кубіт як "1", які видимі в останніх чотирьох стовпцях. Ці запуски відкидаються. Примітка: Допоміжний кубіт також може вносити нові помилки в схему. Щоб зменшити цей ефект, ми можемо вставити вкладені перевірки з додатковими допоміжними кубітами в квантову схему.
Приклад великого масштабу на обладнанні
Крок 1: Відображення класичних вхідних даних на квантову задачу
Тепер ми продемонструємо важливе завдання для алгоритмів квантових обчислень, яким є підготовка стану GHZ. Ми покажемо, як це зробити на реальному бекенді з використанням виявлення помилок.
# Set optional seed for reproducibility
SEED = 1

if SEED:
    np.random.seed(SEED)
Алгоритм виявлення помилок для підготовки стану GHZ враховує топологію обладнання. Ми починаємо з вибору бажаного обладнання.
# This is used to run on real hardware
service = QiskitRuntimeService()

# Choose a backend to build GHZ on
backend_name = service.least_busy(
    operational=True, simulator=False, min_num_qubits=133
)

backend = service.backend(backend_name)
coupling_map = backend.target.build_coupling_map()
Стан GHZ на кубітах визначається як
Дуже наївний підхід до підготовки стану GHZ полягав би у виборі кореневого кубіта з початковим гейтом Адамара, який переводить кубіт у стан рівної суперпозиції, а потім у заплутуванні цього кубіта з кожним іншим кубітом. Це не дуже гарний підхід, оскільки він вимагає далекосяжних і глибоких взаємодій CNOT. У цьому посібнику ми використаємо кілька технік поряд із виявленням помилок для надійної підготовки стану GHZ на реальному обладнанні.
Крок 2: Оптимізація задачі для виконання на квантовому обладнанні
Відображення стану GHZ на обладнання
Спочатку ми шукаємо корінь для відображення схеми GHZ на обладнання. Ми видаляємо ребра/вузли, чиї помилки CZ, помилки вимірювання та значення є гіршими за пороги нижче. Вони не будуть включені до схеми GHZ.
def bad_cz(target, threshold=0.01):
    """Return list of edges whose CZ error is worse than threshold."""
    undirected_edges = []
    for edge in backend.target.build_coupling_map().get_edges():
        if (edge[1], edge[0]) not in undirected_edges:
            undirected_edges.append(edge)
    edges = undirected_edges
    cz_errors = {}
    for edge in edges:
        cz_errors[edge] = target["cz"][edge].error
    worst_edges = sorted(cz_errors.items(), key=lambda x: x[1], reverse=True)
    return [list(edge) for edge, error in worst_edges if error > threshold]

def bad_readout(target, threshold=0.01):
    """Return list of nodes whose measurement error is worse than threshold."""
    meas_errors = {}
    for node in range(backend.num_qubits):
        meas_errors[node] = target["measure"][(node,)].error
    worst_nodes = sorted(
        meas_errors.items(), key=lambda x: x[1], reverse=True
    )
    return [node for node, error in worst_nodes if error > threshold]

def bad_coherence(target, threshold=60):
    """Return list of nodes whose T2 value is lower than threshold."""
    t2s = {}
    for node in range(backend.num_qubits):
        t2 = target.qubit_properties[node].t2
        t2s[node] = t2 * 1e6 if t2 else 0
    worst_nodes = sorted(t2s.items(), key=lambda x: x[1])
    return [node for node, val in worst_nodes if val < threshold]

THRESH_CZ = 0.025  # exclude from BFS those edges whose
# CZ error is worse than this threshold
THRESH_MEAS = 0.15  # exclude from BFS those nodes whose
# measurement error is worse than this threshold
THRESH_T2 = 10  # exclude from BFS those nodes whose
# T2 value is lower than this threshold

bad_edges = bad_cz(backend.target, threshold=THRESH_CZ)
bad_nodes_readout = bad_readout(backend.target, threshold=THRESH_MEAS)
dead_qubits = bad_readout(backend.target, threshold=0.4)
bad_nodes_coherence = bad_coherence(backend.target, threshold=THRESH_T2)
bad_nodes = list(set(bad_nodes_readout) | set(bad_nodes_coherence))
print(f"{len(bad_edges)} bad edges: \n{bad_edges}")
print(f"{len(bad_nodes)} bad nodes: \n{bad_nodes}")
17 bad edges:
[[30, 31], [112, 113], [113, 114], [113, 119], [120, 121], [130, 131], [145, 146], [146, 147], [111, 112], [55, 59], [64, 65], [131, 138], [131, 132], [119, 133], [129, 130], [47, 57], [29, 38]]
5 bad nodes:
[1, 113, 131, 146, 120]
Використовуючи функцію нижче, ми конструюємо схему GHZ на обраному обладнанні, починаючи з кореня та використовуючи пошук у ширину (BFS).
def parallel_ghz(root, num_qubits, backend, bad_edges, skip):
    """
    Build a GHZ state of size `num_qubits` on the given `backend`,
    starting from `root`, expanding in BFS order.

    At each BFS layer, every active qubit adds at most one new neighbor
    (so that two-qubit operations can run in parallel with no qubit conflicts).

    It grows the entanglement tree outward layer-by-layer.
    """

    # -------------------------------------------------------------
    # (1) Filter usable connections from the backend coupling map
    # -------------------------------------------------------------
    # The coupling map lists all directed hardware connections as (control, target).
    # We remove edges that are:
    #   - listed in `bad_edges` (or their reversed form)
    #   - involve a qubit in the `skip` list
    cmap = [list(edge) for edge in backend.coupling_map.get_edges()]
    edges = [
        e
        for e in cmap
        if e not in bad_edges
        and [e[1], e[0]] not in bad_edges
        and e[0] not in skip
        and e[1] not in skip
    ]

    # -------------------------------------------------------------
    # (2) Build an undirected adjacency list for traversal
    # -------------------------------------------------------------
    # Even though coupling_map edges are directed, BFS expansion just needs
    # connectivity information (so we treat edges as undirected for search).
    adj = defaultdict(list)
    for u, v in edges:
        adj[u].append(v)
        adj[v].append(u)

    # -------------------------------------------------------------
    # (3) Initialize the quantum circuit and BFS state
    # -------------------------------------------------------------
    n = backend.num_qubits
    qc = QuantumCircuit(
        n
    )  # create a circuit with same number of qubits as hardware
    visited = [
        root
    ]  # record the order qubits are added to the GHZ chain/tree
    queue = deque([root])  # BFS queue (start from root)
    explored = defaultdict(
        set
    )  # to track which neighbors each node has already explored
    layers = []  # list of per-layer (control, target) gate tuples
    qc.h(root)  # GHZ states start with a Hadamard on the root qubit

    # -------------------------------------------------------------
    # (4) BFS expansion: build the GHZ tree one layer at a time
    # -------------------------------------------------------------
    # Loop until we've added the desired number of qubits to the GHZ
    while queue and len(visited) < num_qubits:
        layer = []  # collect new (control, target) pairs for this layer
        current = list(
            queue
        )  # snapshot current frontier (so queue mutations don't affect iteration)
        busy = (
            set()
        )  # track qubits already used in this layer (to avoid conflicts)

        for node in current:
            queue.popleft()

            # find one unvisited neighbor of this node not already explored
            unvisited_neighbors = [
                nb
                for nb in adj[node]
                if nb not in visited and nb not in explored[node]
            ]

            if unvisited_neighbors:
                nb = unvisited_neighbors[
                    0
                ]  # pick the first available neighbor
                visited.append(nb)  # mark it as part of the GHZ structure
                queue.append(
                    node
                )  # re-enqueue current node (can keep growing)
                queue.append(nb)  # enqueue the newly added qubit
                explored[node].add(nb)  # mark that edge as explored
                layer.append(
                    (node, nb)
                )  # schedule a CNOT between node and neighbor
                busy.update([node, nb])  # reserve both qubits for this layer

                # stop early if we've reached the desired number of qubits
                if len(visited) == num_qubits:
                    break
            # else: node has no unused unvisited neighbors left → skip

        if layer:
            # add all pairs (node, nb) scheduled this round to layers
            layers.append(layer)
        else:
            # nothing new discovered this pass → done
            break

    # -------------------------------------------------------------
    # (5) Emit all layers into the quantum circuit
    # -------------------------------------------------------------
    # For each layer:
    #   - apply a CX gate for every (control, target) pair
    #   - insert a barrier so transpiler keeps layer structure
    for layer in layers:
        for q1, q2 in layer:
            qc.cx(q1, q2)
        qc.barrier()

    # -------------------------------------------------------------
    # (6) Return outputs
    # -------------------------------------------------------------
    # qc: the built quantum circuit
    # visited: order of qubits added
    # layers: list of parallelizable two-qubit operations per step
    return qc, visited, layers
Тепер ми багаторазово шукаємо найкращий корінь, з якого буде походити схема GHZ.
ROOT = None  # root for BFS search
GHZ_SIZE = 100  # number of (data) qubits in the GHZ state
SKIP = []  # nodes to intentionally skip for a better chance of finding checks

# Search for the best root (yielding the shallowest GHZ)
if ROOT is None:
    best_root = -1
    base_depth = 100
    for root in range(backend.num_qubits):
        qc, ghz_qubits, _ = parallel_ghz(
            root, GHZ_SIZE, backend, bad_edges, SKIP
        )
        if len(ghz_qubits) != GHZ_SIZE:
            continue
        depth = qc.depth(lambda x: x.operation.num_qubits == 2)
        if depth < base_depth:
            best_root = root
            base_depth = depth
    ROOT = best_root
Тепер ми конструюємо схему GHZ, починаючи з конкретного вузла - тобто найкращого кореня - шукаючи найменшу глибину за допомогою пошуку в ширину.
# Build a GHZ starting at the best root
qc, ghz_qubits, _ = parallel_ghz(
    ROOT, GHZ_SIZE, backend, bad_edges, SKIP + bad_nodes
)
base_depth = qc.depth(lambda x: x.operation.num_qubits == 2)
base_count = qc.size(lambda x: x.operation.num_qubits == 2)
print(f"base depth: {base_depth}, base count: {base_count}")
print(f"ROOT: {ROOT}")
if len(ghz_qubits) != GHZ_SIZE:
    raise Exception("No GHZ found. Relax error thresholds.")
base depth: 17, base count: 99
ROOT: 50
Нам потрібне ще одне остаточне міркування перед вставкою валідних перевірок. Це пов'язано з концепцією "покриття", яка є мірою того, скільки з проводів у квантовій схемі може покрити перевірка. З вищим покриттям ми можемо виявляти помилки на ширшій частині схеми. За допомогою цієї міри ми можемо вибирати серед валідних перевірок ті, що мають найвище покриття схеми. Іншими словами, ми будемо використовувати функцію weighted_coverage для оцінки різних перевірок для схеми GHZ.
def weighted_coverage(layers, parities, w_idle=0.2, w_gate=0.8):
    """
    Compute weighted fraction (idle + gate) of wires that are
    covered by at least one parity to all active wires.
    """
    wires = active_wires(layers)  # defined below
    covered_by_any = {n_layer: set() for n_layer in range(len(layers))}
    for parity in parities:
        trace = z_trace_backward(layers, parity)  # defined below
        for n_layer, qs in trace.items():
            covered_by_any[n_layer] |= qs
    covered_weight = 0
    total_weight = 0
    for n_layer in range(len(layers)):
        idle = wires[n_layer]["idle"]
        gate = wires[n_layer]["gate"]
        total_weight += w_idle * len(idle) + w_gate * len(gate)
        covered_idle = covered_by_any[n_layer] & idle
        covered_gate = covered_by_any[n_layer] & gate
        covered_weight += w_idle * len(covered_idle) + w_gate * len(
            covered_gate
        )
    return covered_weight / total_weight if total_weight > 0 else 0

def active_wires(layers):
    """
    Returns per-layer dict with two sets:
    - 'idle': activated wires that are idle in this layer
    - 'gate': activated wires that are control/target of a CNOT at this layer
    """
    first_activation = {}
    for n_layer, layer in enumerate(layers):
        for c, t in layer:
            first_activation.setdefault(c, n_layer)
            first_activation.setdefault(t, n_layer)
    result = {}
    for n_layer in range(len(layers)):
        active = {
            q
            for q, n_layer0 in first_activation.items()
            if n_layer >= n_layer0
        }
        gate = {q for c, t in layers[n_layer] for q in (c, t)}
        idle = active - gate
        result[n_layer] = {"idle": idle, "gate": gate}
    return result

def z_trace_backward(layers, initial_Zs):
    """
    Backward propagate Zs with parity cancellation.
    Returns {layer: set of qubits with odd parity Z at that layer}.
    """
    wires = active_wires(layers)
    support = set(initial_Zs)
    trace = {}
    for n_layer in range(len(layers) - 1, -1, -1):
        active = wires[n_layer]["idle"] | wires[n_layer]["gate"]
        trace[n_layer] = support & active
        # propagate backwards
        new_support = set()
        for q in support:
            hit = False
            for c, t in layers[n_layer]:
                if q == t:  # Z on target: copy to control
                    new_support ^= {t, c}  # toggle both
                    hit = True
                    break
                elif q == c:  # Z on control: passes through
                    new_support ^= {c}
                    hit = True
                    break
            if not hit:  # unaffected
                new_support ^= {q}
        support = new_support
    return trace
Тепер ми можемо вставити перевірки до схеми GHZ. Знаходження валідних перевірок є дуже зручним для стану GHZ, оскільки будь-який двокубітний оператор Паулі оператор , що діє на будь-які два кубіти схеми GHZ, є носієм і тому валідною перевіркою.
Також зауваж, що перевірки у цьому випадку є керованими- операторами, які сусідні з гейтами Адамара зліва та справа на анцилярному кубіті. Це еквівалентно гейту CNOT, застосованому до анцилярного кубіта. Код нижче вставляє перевірки до схеми.
# --- Tunables controlling the search space / scoring ---
MAX_SKIPS = 10  # at most how many qubits to skip
# (in addition to the bad ones and the ones forced to skip above)
SHUFFLES = 200  # how many times to try removing nodes for checks
MAX_DEPTH_INCREASE = 10  # how far from the base GHZ depth to go
# to include checks (increase this for
# more checks at expense of depth)

W_IDLE = 0.2  # weight of errors to consider during idle timesteps
W_GATE = 0.8  # weight of errors to consider during gates

# Remove random nodes from the GHZ and build from the root
# again to increase checks
degree_two_nodes = [
    i
    for i in ghz_qubits
    if all(n in ghz_qubits for n in coupling_map.neighbors(i))
    and len(coupling_map.neighbors(i)) >= 2
]

# --- Best-so-far tracking for the randomized search ---
num_checks = 0
best_covered_fraction = -1
best_qc = qc
best_checks = []
best_parities = []
best_layers = []

# Outer loop: vary how many GHZ nodes we try skipping (0..MAX_SKIPS-1)
for num_skips in range(MAX_SKIPS):
    # Inner loop: try SHUFFLES random choices of 'num_skips' nodes to skip
    for _ in range(SHUFFLES):
        # Construct the skip set:
        #   - pre-existing forced SKIP
        #   - plus a random sample of 'degree_two_nodes' of size 'num_skips'
        skip = SKIP + list(np.random.choice(degree_two_nodes, num_skips))

        # Rebuild the GHZ using the current skip set and bad_nodes
        qc, ghz_qubits, layers = parallel_ghz(
            ROOT, GHZ_SIZE, backend, bad_edges, skip + bad_nodes
        )

        # Measure circuit cost as 2-qubit-gate depth only
        depth = qc.depth(lambda x: x.operation.num_qubits == 2)

        # If we failed to reach the target GHZ size, discard this attempt
        if len(ghz_qubits) != GHZ_SIZE:
            continue

        # --- Build "checks" around the GHZ we just constructed ---
        # A check qubit is a non-GHZ, non-dead qubit that has ≥2
        # neighbors inside the GHZ and all those incident
        # edges are usable (i.e., not in bad_edges).
        checks = []
        parities = []
        for i in range(backend.num_qubits):
            neighbors = [
                n for n in coupling_map.neighbors(i) if n in ghz_qubits
            ]

            if (
                i not in ghz_qubits
                and i not in dead_qubits
                and len(neighbors) >= 2
                and not any(
                    [
                        [neighbor, i] in bad_edges
                        or [i, neighbor] in bad_edges
                        for neighbor in neighbors
                    ]
                )
            ):
                # Record this qubit as a check qubit
                checks.append(i)
                parities.append((neighbors[0], neighbors[1]))
                # Physically couple the check qubit 'i' to the two GHZ
                # neighbors via CNOTs
                # (This is the actual "check" attachment in the circuit.)
                qc.cx(neighbors[0], i)
                qc.cx(neighbors[1], i)

        # Score this design using the weighted coverage
        # metric over the GHZ build layers
        covered_fraction = weighted_coverage(
            layers=layers, parities=parities, w_idle=W_IDLE, w_gate=W_GATE
        )

        # Keep it only if:
        #   - coverage improves over the best so far, AND
        #   - the 2q depth budget isn't blown by more than MAX_DEPTH_INCREASE
        if (
            covered_fraction > best_covered_fraction
            and depth <= base_depth + MAX_DEPTH_INCREASE
        ):
            best_covered_fraction = covered_fraction
            best_qc = qc
            best_ghz_qubits = ghz_qubits
            best_checks = checks
            best_parities = parities
            best_layers = layers
Тепер ми можемо вивести кубіти, використані в схемі GHZ, та кубіти перевірки.
# --- After search, report the best design found ---
qc = best_qc
checks = best_checks
parities = best_parities
layers = best_layers
ghz_qubits = best_ghz_qubits
if len(ghz_qubits) != GHZ_SIZE:
    raise Exception("No GHZ found. Relax error thresholds.")

print(f"GHZ qubits: {ghz_qubits} {len(ghz_qubits)}")
print(f"Check qubits: {checks} {len(checks)}")

covered_fraction = weighted_coverage(
    layers=layers, parities=parities, w_idle=W_IDLE, w_gate=W_GATE
)
print(
    "Covered fraction (no idle): ",
    weighted_coverage(
        layers=layers, parities=parities, w_idle=0.0, w_gate=1.0
    ),
)
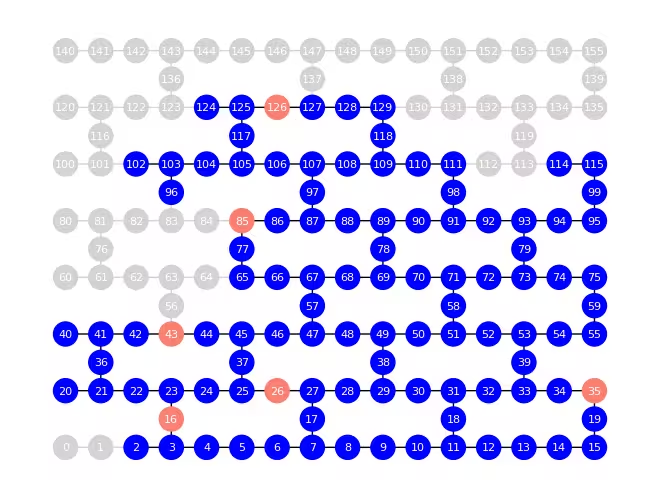
GHZ qubits: [50, 49, 51, 38, 52, 48, 58, 53, 47, 71, 39, 46, 70, 54, 33, 45, 72, 69, 55, 32, 37, 73, 68, 34, 31, 44, 25, 74, 78, 67, 18, 24, 79, 75, 89, 57, 11, 23, 93, 59, 88, 66, 10, 22, 92, 90, 87, 65, 12, 9, 21, 94, 91, 86, 77, 13, 8, 20, 95, 98, 97, 14, 7, 36, 99, 111, 107, 15, 6, 41, 115, 110, 106, 19, 17, 5, 40, 114, 109, 108, 105, 27, 4, 42, 118, 104, 28, 3, 129, 117, 103, 29, 2, 128, 125, 96, 30, 127, 124, 102] 100
Check qubits: [16, 26, 35, 43, 85, 126] 6
Covered fraction (no idle):  0.4595959595959596
Ми також можемо вивести деяку статистику помилок.
def circuit_errors(target, circ, error_type="cz"):
    """
    Pull per-resource error numbers from a Qiskit Target
    for ONLY the qubits/edges actually used by `circ`.

    Args:
        target: qiskit.transpiler.Target (e.g., backend.target)
        circ:   qiskit.QuantumCircuit
        error_type: one of {"cz", "meas", "t1", "t2"}:
            - "cz"   -> 2q CZ gate error on the circuit's used edges
            - "meas" -> measurement error on the circuit's used qubits
            - "t1"   -> T1 (converted to microseconds) on used qubits
            - "t2"   -> T2 (converted to microseconds) on used qubits

    Returns:
        list[float] of the requested quantity for the active edges/qubits.
    """

    # Get all 2-qubit edges that appear in the circuit (as undirected pairs).
    active_edges = active_gates(circ)  # e.g., {(0,1), (2,3), ...}

    # Intersect those with the device coupling map (so we only query valid edges).
    # Note: target.build_coupling_map().get_edges() yields directed pairs.
    edges = [
        edge
        for edge in target.build_coupling_map().get_edges()
        if tuple(sorted(edge)) in active_edges
    ]

    # Deduplicate direction: keep only one orientation of each edge.
    undirected_edges = []
    for edge in edges:
        if (edge[1], edge[0]) not in undirected_edges:
            undirected_edges.append(edge)
    edges = undirected_edges  # (not used later—see note below)

    # Accumulators for different error/physics quantities
    cz_errors, meas_errors, t1_errors, t2_errors = [], [], [], []

    # For every active (undirected) edge in the circuit, fetch its CZ error.
    # NOTE: Uses active_gates(circ) again (undirected tuples). This assumes
    # `target['cz']` accepts undirected indexing;
    # many Targets store both directions.
    for edge in active_gates(circ):
        cz_errors.append(target["cz"][edge].error)

    # For every active qubit, fetch measure error and T1/T2 (converted to µs).
    for qubit in active_qubits(circ):
        meas_errors.append(target["measure"][(qubit,)].error)
        t1_errors.append(
            target.qubit_properties[qubit].t1 * 1e6
        )  # seconds -> microseconds
        t2_errors.append(
            target.qubit_properties[qubit].t2 * 1e6
        )  # seconds -> microseconds

    # Select which set to return.
    if error_type == "cz":
        return cz_errors
    elif error_type == "meas":
        return meas_errors
    elif error_type == "t1":
        return t1_errors
    else:
        return t2_errors

def active_qubits(circ):
    """
    Return a list of qubit indices that participate in at least one
    non-delay, non-barrier instruction in `circ`.
    """
    active_qubits = set()
    for inst in circ.data:
        # Skip scheduling artifacts that don't act on state
        if (
            inst.operation.name != "delay"
            and inst.operation.name != "barrier"
        ):
            for qubit in inst.qubits:
                q = circ.find_bit(
                    qubit
                ).index  # map Qubit object -> integer index
                active_qubits.add(q)
    return list(active_qubits)

def active_gates(circ):
    """
    Return a set of undirected 2-qubit edges (i, j) that appear in `circ`.
    """
    used_2q_gates = set()
    for inst in circ:
        if inst.operation.num_qubits == 2:
            qs = inst.qubits
            # map Qubit objects -> indices, then sort to make the edge undirected
            qs = sorted([circ.find_bit(q).index for q in qs])
            used_2q_gates.add(tuple(sorted(qs)))
    return used_2q_gates

# ---- Print summary statistics ----
cz_errors = circuit_errors(backend.target, qc, error_type="cz")
meas_errors = circuit_errors(backend.target, qc, error_type="meas")
t1_errors = circuit_errors(backend.target, qc, error_type="t1")
t2_errors = circuit_errors(backend.target, qc, error_type="t2")

np.set_printoptions(linewidth=np.inf)
print(
    f"cz errors: \n mean: {np.round(np.mean(cz_errors), 3)}, "
    f"max: {np.round(np.max(cz_errors), 3)}"
)
print(
    f"meas errors: \n mean: {np.round(np.mean(meas_errors), 3)}, "
    f"max: {np.round(np.max(meas_errors), 3)}"
)
print(
    f"t1 errors: \n mean: {np.round(np.mean(t1_errors), 1)}, "
    f"min: {np.round(np.min(t1_errors), 1)}"
)
print(
    f"t2 errors: \n mean: {np.round(np.mean(t2_errors), 1)}, "
    f"min: {np.round(np.min(t2_errors), 1)}"
)
cz errors:
 mean: 0.002, max: 0.012
meas errors:
 mean: 0.014, max: 0.121
t1 errors:
 mean: 267.9, min: 23.6
t2 errors:
 mean: 155.9, min: 13.9
Як і раніше, ми можемо спочатку симулювати схему за відсутності шуму, щоб забезпечити коректність схеми підготовки стану GHZ.
# --- Simulate to ensure correctness ---

qc_meas = qc.copy()

# Add measurements to the GHZ qubits
c1 = ClassicalRegister(len(ghz_qubits), "c1")
qc_meas.add_register(c1)
for q, c in zip(ghz_qubits, c1):
    qc_meas.measure(q, c)

# Add measurements to the check qubits
if len(checks) > 0:
    c2 = ClassicalRegister(len(checks), "c2")
    qc_meas.add_register(c2)
    for q, c in zip(checks, c2):
        qc_meas.measure(q, c)

# Simulate the circuit with stabilizer method
sim_stab = AerSimulator(method="stabilizer")
res = sim_stab.run(qc_meas, shots=1000).result()
counts = res.get_counts()
print("Stabilizer simulation result:")
print(counts)

# Rename keys to "0 0" and "0 1" for easier plotting
# First len(checks) bits are check bits, rest are GHZ bits
keys = list(counts.keys())
for key in keys:
    check_bits = key[: len(checks)]
    ghz_bits = key[(len(checks) + 1) :]
    if set(check_bits) == {"0"} and set(ghz_bits) == {"0"}:
        counts["0 0"] = counts.pop(key)
    elif set(check_bits) == {"0"} and set(ghz_bits) == {"1"}:
        counts["0 1"] = counts.pop(key)
    else:
        continue

plot_histogram(counts)
Stabilizer simulation result:
{'000000 1111111111111111111111111111111111111111111111111111111111111111111111111111111111111111111111111111': 525, '000000 0000000000000000000000000000000000000000000000000000000000000000000000000000000000000000000000000000': 475}

Як і очікувалося, кубіти перевірки вимірюються як всі нулі, і ми успішно підготували стан GHZ.
Крок 3: Виконання з використанням примітивів Qiskit
Тепер ми готові запустити схему на реальному обладнанні та продемонструвати, як протокол виявлення помилок може виявляти помилки при підготовці стану GHZ.
SHOTS = 10000 # number of shots
Ми визначаємо допоміжну функцію для додавання вимірювань до схеми GHZ.
def add_measurements(qc, ghz_qubits, checks):
    # --- Measure each set of qubits into different
    # classical registers to facilitate post-processing ---

    # Add measurements to the GHZ qubits
    c1 = ClassicalRegister(len(ghz_qubits), "c1")
    qc.add_register(c1)
    for q, c in zip(ghz_qubits, c1):
        qc.measure(q, c)

    # Add measurements to the check qubits
    c2 = ClassicalRegister(len(checks), "c2")
    qc.add_register(c2)
    for q, c in zip(checks, c2):
        qc.measure(q, c)

    return qc
Перед виконанням ми відображаємо розташування кубітів GHZ та перевірочних кубітів на вибраному обладнанні.
# Plot the layout of GHZ and check qubits on the device
plot_gate_map(
    backend,
    label_qubits=True,
    line_width=20,
    line_color=[
        "black"
        if edge[0] in ghz_qubits + checks and edge[1] in ghz_qubits + checks
        else "lightgrey"
        for edge in backend.coupling_map.graph.edge_list()
    ],
    qubit_color=[
        "blue"
        if i in ghz_qubits
        else "salmon"
        if i in checks
        else "lightgrey"
        for i in range(0, backend.num_qubits)
    ],
)
plt.show()
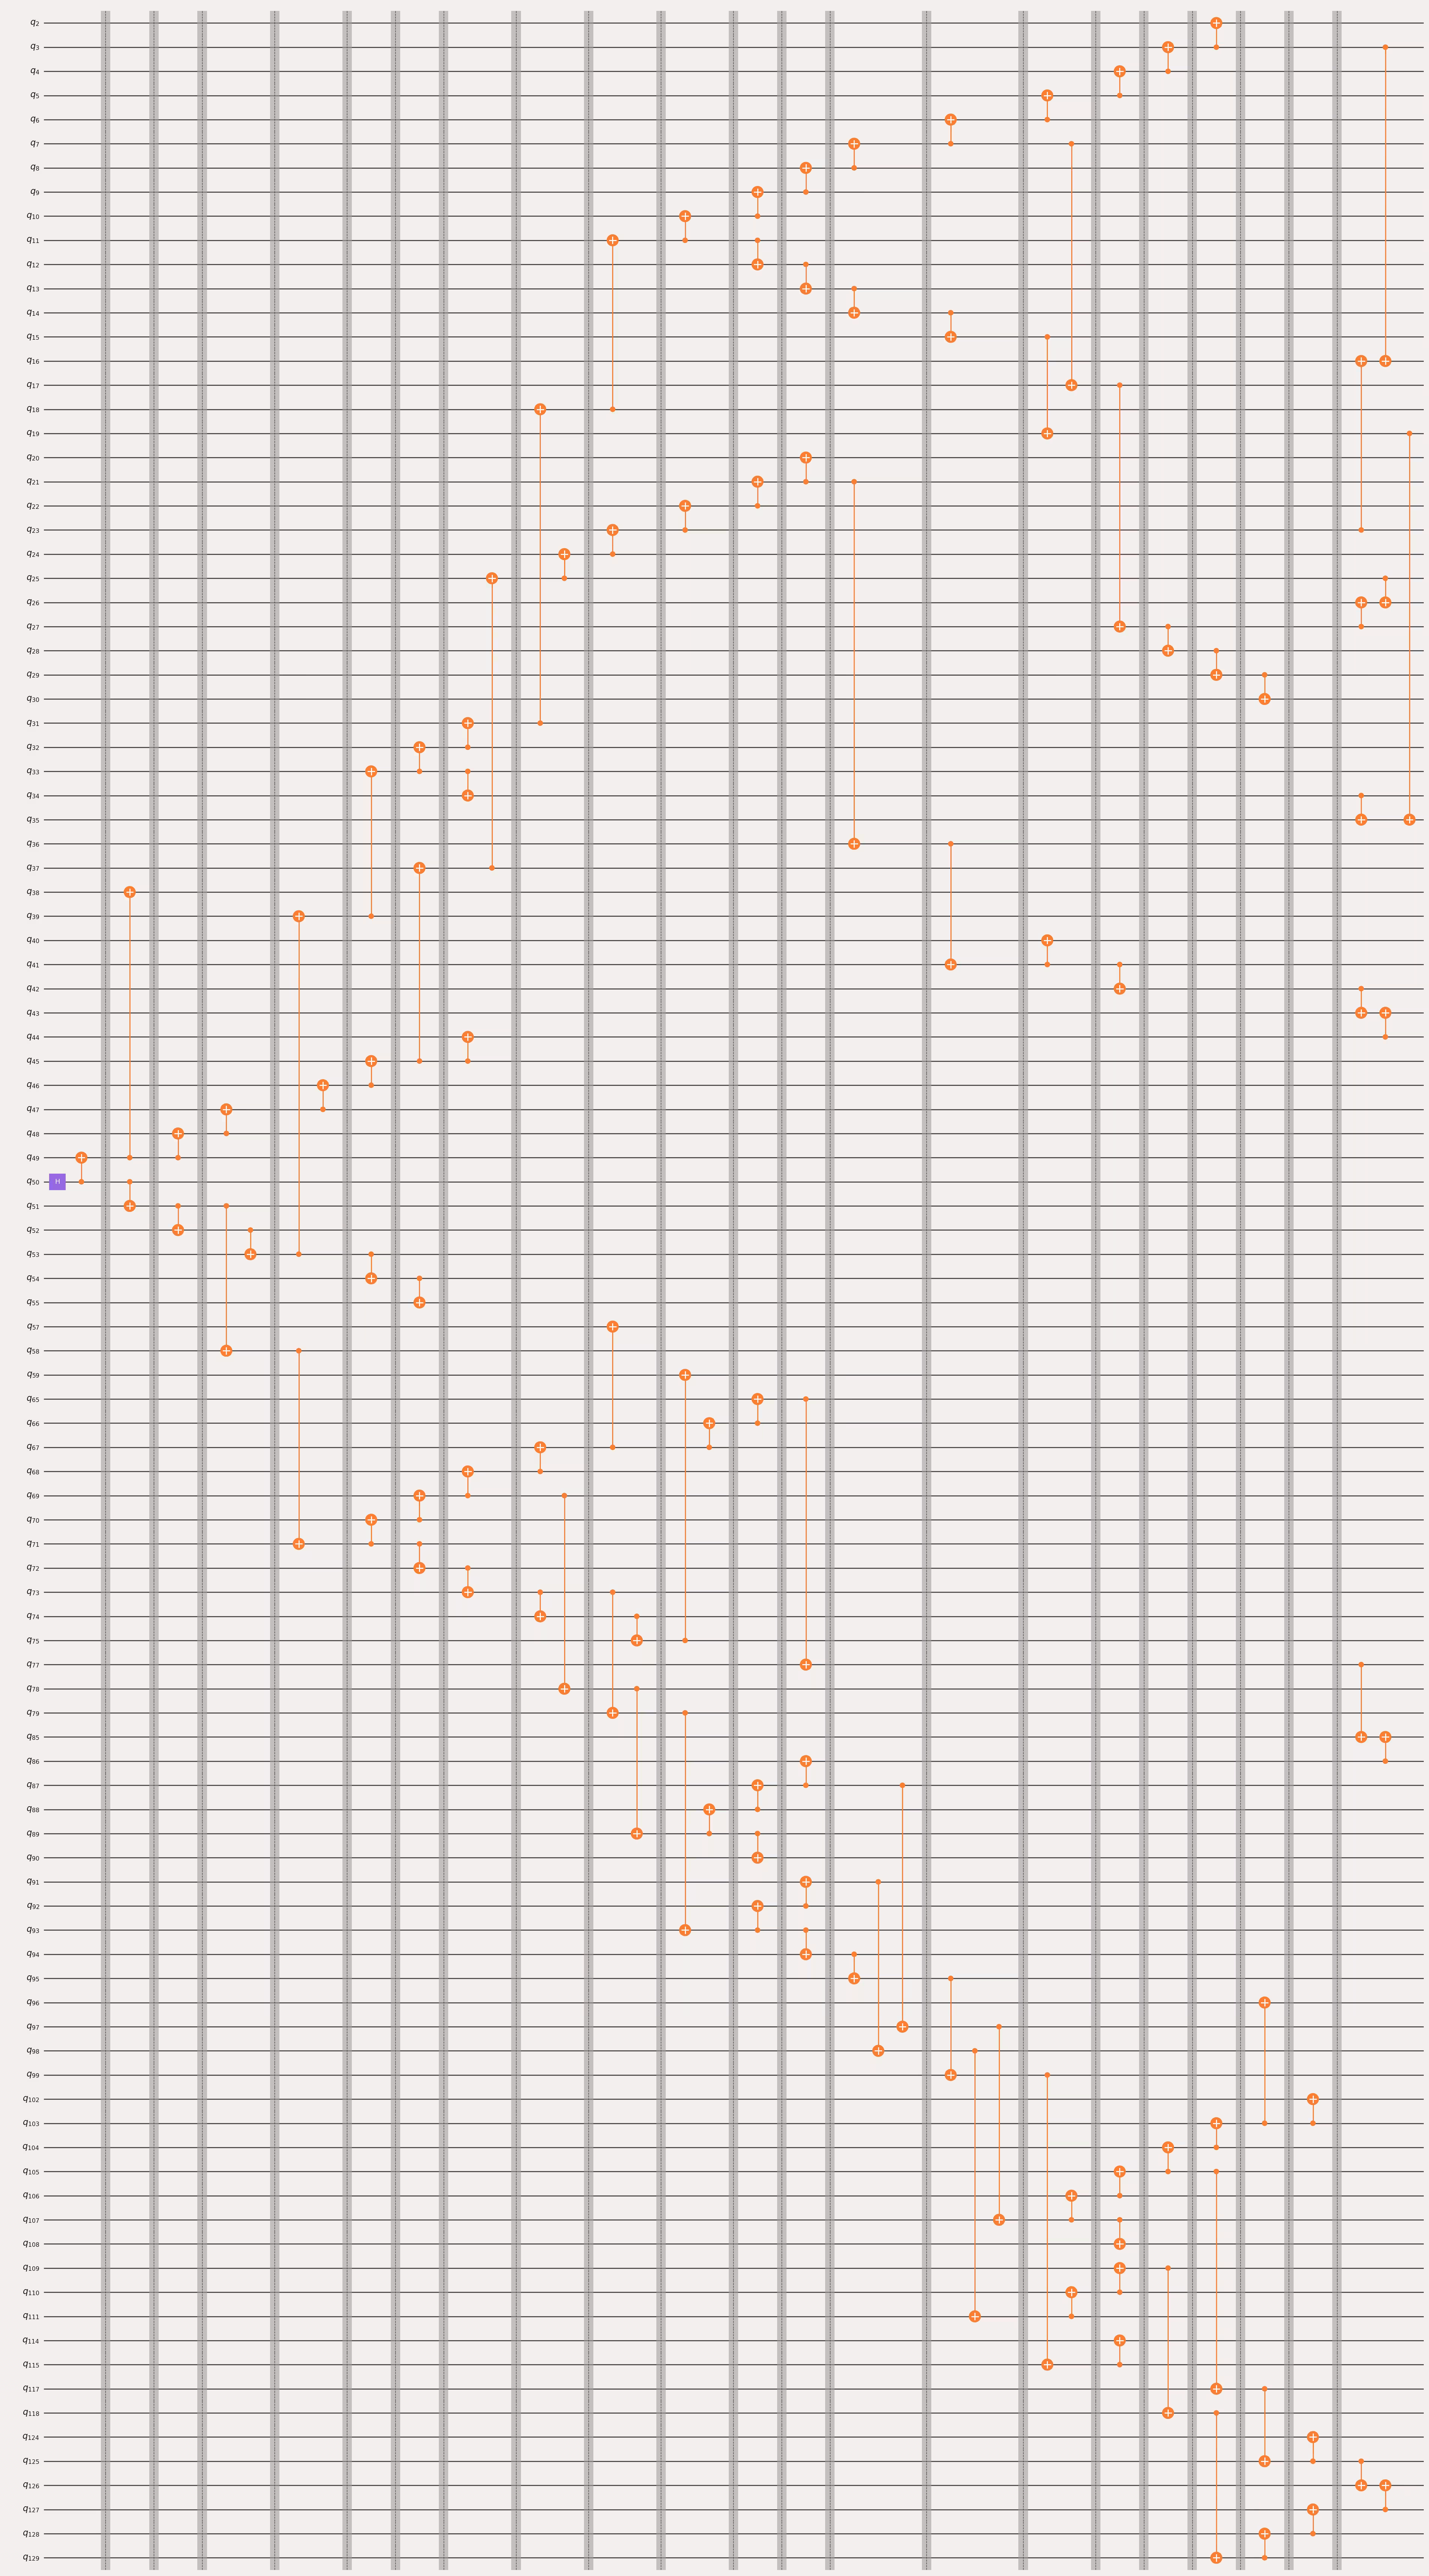
qc.draw("mpl", idle_wires=False, fold=-1)
Тепер ми додаємо вимірювання.
qc = add_measurements(qc, ghz_qubits, checks)
Конвеєр планування нижче фіксує час, видаляє бар'єри, спрощує затримки та вводить динамічне роз'єднання, зберігаючи при цьому оригінальний час операцій.
# The scheduling consists of first inserting delays while barriers
# are still there, then removing the barriers and consolidating the
# delays, so that the operations do not move in time
# Lastly we replace delays with dynamical decoupling
collect_function = partial(
    collect_using_filter_function,
    filter_function=(lambda node: node.op.name == "delay"),
    split_blocks=True,
    min_block_size=2,
    split_layers=False,
    collect_from_back=False,
    max_block_width=None,
)

collapse_function = partial(
    collapse_to_operation,
    collapse_function=(
        lambda circ: Delay(sum(inst.operation.duration for inst in circ))
    ),
)

class Unschedule(AnalysisPass):
    """Removes a property from the passmanager property set so that the
    circuit looks unscheduled, so we can schedule it again."""

    def run(self, dag):
        del self.property_set["node_start_time"]

def build_passmanager(backend, dd_qubits=None):
    pm = generate_preset_pass_manager(
        target=backend.target,
        layout_method="trivial",
        optimization_level=2,
        routing_method="none",
    )

    pm.scheduling = PassManager(
        [
            ALAPScheduleAnalysis(target=backend.target),
            PadDelay(target=backend.target),
            RemoveBarriers(),
            Unschedule(),
            CollectAndCollapse(
                collect_function=collect_function,
                collapse_function=collapse_function,
            ),
            ALAPScheduleAnalysis(target=backend.target),
            PadDynamicalDecoupling(
                dd_sequence=[XGate(), RZGate(-np.pi), XGate(), RZGate(np.pi)],
                spacing=[1 / 4, 1 / 2, 0, 0, 1 / 4],
                target=backend.target,
                qubits=dd_qubits,
            ),
        ]
    )

    return pm
Тепер ми можемо використовувати користувацький менеджер проходів для транспіляції схеми для вибраного бекенда.
# Transpile the circuits for the backend
pm = build_passmanager(backend, ghz_qubits)

# Instruction set architecture (ISA) level circuit after scheduling and
# DD insertion
isa_circuit = pm.run(qc)

# Draw after scheduling and DD insertion
# timeline_drawer(isa_circuit, show_idle=False, time_range=(0, 1000),
# target=backend.target)
isa_circuit.draw("mpl", fold=-1, idle_wires=False)

Потім ми надсилаємо завдання, використовуючи примітив Sampler з Qiskit Runtime.
# Select the Sampler options
sampler = Sampler(mode=backend)
sampler.options.default_shots = SHOTS
sampler.options.dynamical_decoupling.enable = False
sampler.options.execution.rep_delay = 0.00025
sampler.options.environment.job_tags = ["TUT_EDSC"]

# Submit the job
print("Submitting Sampler job")
ghz_job = sampler.run([isa_circuit])

print(ghz_job.job_id())
d493f17nmdfs73abf9qg
Крок 4: Постобробка та повернення результату в бажаному класичному форматі
Тепер ми можемо отримати та проаналізувати результати завдання Sampler.
# Retrieve the job results
job_result = ghz_job.result()
# Get the counts from GHZ and check qubit measurements
ghz_counts = job_result[0].data.c1.get_counts()
checks_counts = job_result[0].data.c2.get_counts()
# Post-process to get unflagged GHZ counts (i.e., check bits are all '0')
joined_counts = job_result[0].join_data().get_counts()
unflagged_counts = {}
for key, count in joined_counts.items():
    check_bits = key[: len(checks)]
    ghz_bits = key[len(checks) :]
    if set(check_bits) == {"0"}:
        unflagged_counts[ghz_bits] = count
# Get top 20 outcomes by frequency from the unflagged counts
top_counts = dict(
    sorted(unflagged_counts.items(), key=lambda x: x[1], reverse=True)[:20]
)

# Rename keys for better visualization
top_counts_renamed = {}
i = 0
for key, count in top_counts.items():
    if set(key) == {"0"}:
        top_counts_renamed["all 0s"] = count
    elif set(key) == {"1"}:
        top_counts_renamed["all 1s"] = count
    else:
        top_counts_renamed[f"other_{i}"] = count
        i += 1

plot_histogram(top_counts_renamed, figsize=(12, 7))
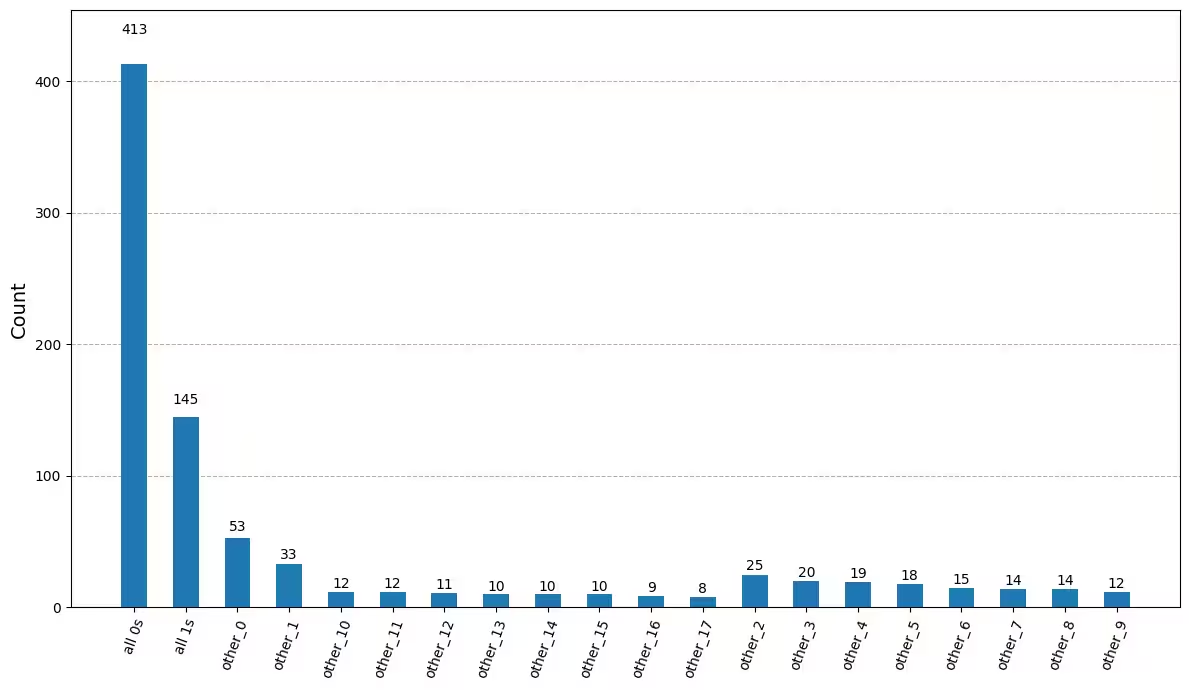
На гістограмі вище ми відобразили 20 вимірювань бітових рядків з кубітів GHZ, які не були позначені перевірочними кубітами. Як і очікувалося, бітові рядки всіх-0 та всіх-1 мають найвищі підрахунки. Зверни увагу, що деякі помилкові бітові рядки з низькою вагою помилок не були виявлені при виявленні помилок. Найвищі підрахунки все ще знаходяться в очікуваних бітових рядках.
Наступні кроки
Якщо ця робота тебе зацікавила, можливо тебе зацікавлять такі матеріали:
- Для подальшого вивчення технічних деталей підготовки стану GHZ дивись [3]. На додаток до виявлення помилок, автори використовують пом'якшення помилок зчитування за допомогою M3 та TREX і виконують техніки тимчасового обернення обчислень для підготовки високоточних станів GHZ.
- Посібник з кодів повторення.
Посилання
- [1] Martiel, S., & Javadi-Abhari, A. (2025). Low-overhead error detection with spacetime codes. arXiv preprint arXiv:2504.15725.
- [2] van den Berg, E., Bravyi, S., Gambetta, J. M., Jurcevic, P., Maslov, D., & Temme, K. (2023). Single-shot error mitigation by coherent Pauli checks. Physical Review Research, 5(3), 033193.
- [3] Javadi-Abhari, A., Martiel, S., Seif, A., Takita, M., & Wei, K. X. (2025). Big cats: entanglement in 120 qubits and beyond. arXiv preprint arXiv:2510.09520.